1. Open the Bank accounts form. (Click Cash and
bank management > Common > Bank 1.accounts > Bank
accounts.)
2. Open the Inbound ports form. (Click System
administration > Setup > Services and 5.Application
Integration Framework > Inbound port.)
3. Select the bank account to reconcile and close the
form.
4. Create new service.
5. In the Adapter field, select Files system
adapter. 7.
6. In the URI field, select a location to put the
bank files in.
7. On the Service contract customizations FastTab,
click Service operations.
8. In the Select service operations form, select
the following entries in the Remaining service operations list, and move
them to the Selected service operations list:
·
BankStmtService.create
·
BankStmtService.delete
·
BankStmtService.find
·
BankStmtService.getChangedKeys
·
BankStmtService.getKeys
·
BankStmtService.read
9. Open the Application Object Tree (AOT) (press Ctrl+D),
and expand the Resources node.
10. Locate the resources starting with MT940.
11. Right-click each resource, and then click Open.
Then, in the Preview form, in the File type field, 13.select XML
document.
12. Click Export, and then close the AOT. Do the
same for both resources. It will create a XSTLS file on the given location.
13. In the Inbound ports form, on the Processing
options FastTab, select the check box next to Transform all requests,
and then click Inbound transforms
14. In the Inbound transforms form, click Manage
transforms.
15. In the Manage transforms form, create a new
entry. In the Type field, select XSL.
16. Click Load, and then browse for the Extensible
Stylesheet Language Transformation (XSLT) files 1 for the MT940 files. These
files have the .xslt extension.
18. In the Inbound transforms form, create a new
entry. In the Transform name field, select the XSLT entries. When you
receive a warning message, click Yes.
19. Do the same thing for both files
(MT940TXT-to-MT940XML.xslt & MT940XML-to-Reconciliation). Also take care of
the sequences of the files.
20. On the Troubleshooting FastTab, in the Logging
mode field, select Original document.
On the
Security FastTab, in the Restrict to partition field, select initial.
21. Click Activate to activate the inbound port.
Import bank statement using
advanced bank reconciliation
After you’ve set up the advanced
bank reconciliation import, you can import electronic bank statements.
23. Open the Cash and bank management parameters form.
(Click Cash and bank 1.management > Setup > Cash
and bank management parameters.)
24. Click the Bank reconciliation link, and then
select the options to use for advanced bank reconciliation.
25. Click the Number sequences link, and then select
a number sequence for Reconcile ID, 3.Statement ID, and Download
ID. Close the form
26. Open the Bank statement format form. (Click Cash
and bank management > Setup > Bank reconciliation > Bank
statement format.)
27. Click New to create a new bank statement format.
28. In the Inbound port field, select the inbound
port that you created during the setup of advanced bank reconciliation import.
Save and close the form.
Setup part for importing bank
statement has been done. These are the main 3 setup (Resources and export file,Manage Transform and Statement format ) which we need to take care before importing
any statement.
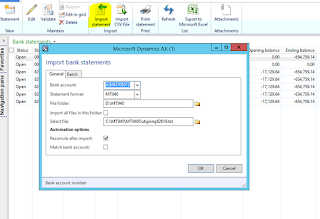
Import Statement
·
Open the Bank
accounts list page. (Click Cash and bank management > Common >
Bank accounts.)
·
Select a bank
account for which we will import the statement.
·
On the Action
Pane, click Bank statements.
This will take you in the
statement form select import statement from the form and select the file to be
upload.


 .
.